
Ever tried making paneer at home and ended up with a block that falls apart the moment you touch it? You’re not alone. There’s nothing sadder than prepping for silky cubes of paneer in your curry only to watch them dissolve or scatter into bits. The real headache starts when you think you followed the recipe to the letter and still got a crumbly mess. This problem isn’t new—even after dozens of tries, I get random pangs of doubt every time I strain the curds. My daughter Larissa’s disappointed face is enough motivation to dig deep until I crack the code for that perfect, soft, restaurant-style paneer.
What's Behind Crumbly Paneer?
Let’s face it, paneer doesn’t forgive laziness or even the slightest misstep. The main villain in crumbly homemade paneer usually lurks in the details: the temperature of the milk, the amount and type of acid, and how you handle the curds. Paneer is all about chemistry. When milk gets heated and acid is added (lemon juice or vinegar are the usual suspects), it splits into curds and whey. What you’re left with after straining is the curd—your future paneer block. If the milk isn’t just above boiling or the acid amount’s off, things go sideways fast. Too much acid and the proteins tighten up, creating dry, brittle curds that don’t want to hold together. Too little, and it won’t separate fully, making the texture rubbery or weak. I learned the hard way that grocery store UHT milk really isn’t up for this gig; the high temps during processing break down the proteins too much. Fresh, full-fat milk is your best friend here—paneer made from skim or low-fat usually tastes dry and chalky, lacking that classic rich mouthfeel.
The stories of catastrophe come from simple mistakes. Many people let the milk boil instead of just bringing it to a boil, or they stir vigorously after adding acid, which shatters the curds into tiny pieces instead of big fluffy clouds. Those little pieces just can’t be pressed into a stable block. The right move? As soon as the milk boils, turn off the heat. Add the acid slowly with gentle stirring. The curd should form soft lumps, floating in yellowish whey. If you see tiny granules instead, you’ve either gone too hot or too acidic.
The pressing stage matters too. Don’t just pile on a heavy kitchen pot right after draining. If you don’t allow the curds to cool down first, the heat continues cooking and dries out the paneer further, causing a crumbly finish. Here’s what blows most people’s minds: paneer needs to lose the hot whey but not too much moisture. If you wrap the curds tightly and let excess water drip out under moderate weight for 30-40 minutes, you’ll get smooth paneer that slices neatly. Too much pressure or time and you’re left with a dry, mealy texture. If you need hard numbers, aim for about 500g of weight (not more!) for half a liter of milk. That’s just a heavy saucepan, not your dumbbells.
Let’s look at two common mistakes I see most often:
- High Heat After Curdling: Continuing to heat curds after acid addition makes the proteins tough.
- Pressing While Hot: Squeezing out all moisture while the curds are still piping hot leaves granular, crumbly results.
Tinkering with your own approach might mean adjusting the acid or changing brands of milk. Even weather—humid monsoon or winter dryness—makes a difference in how much whey the curds retain. If you want reliable paneer every time, consistency is key, so make small changes and record what works. As an example, here’s a chart of how different factors affect paneer outcome, straight from my kitchen notebook:
| Factor | Effect on Paneer | Tip |
|---|---|---|
| Milk Fat Content | Higher fat yields creamier, softer paneer | Use whole milk, preferably unhomogenized |
| Acid Type/Amount | Too much makes it crumbly; too little makes it loose | Add acid slowly and stop once curds separate |
| Temperature | Boiling or overheating toughens curds | Heat milk to just at boiling, turn off, then add acid |
| Pressing Time | Longer pressing gives drier, firmer paneer | Press for 30-40 mins under medium weight |
If you need reassurance from the pros, Ammini Ramachandran, author of classic Indian cookbooks, once said:
“Gentle handling and timing during every stage, not shortcuts, are what elevate your homemade paneer from crumbly to creamy.”Wise words, especially when you’re tempted to squeeze out every last drop of whey.
How to Avoid Crumbly Paneer at Home
Now that you know where things usually go wrong, let’s walk through how to make sure you get smooth paneer every time. Step one: start with whole milk, and don’t be shy about splurging on organic or farm-fresh unhomogenized if you can. The higher the fat content, the silkier the result. Smell your milk before you begin; old or slightly sour milk doesn’t set up as well and can carry weird flavors into the finished paneer.
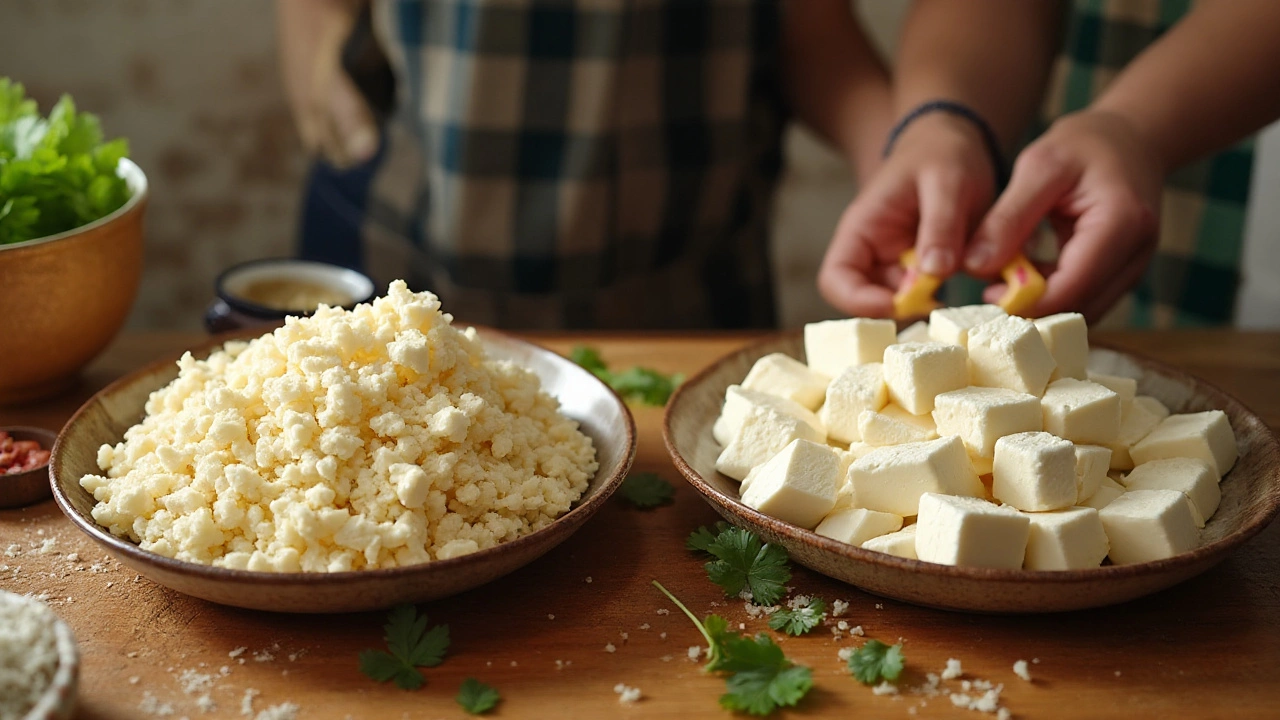
Pour your milk into a heavy-bottomed pan—this helps prevent scorching. Gently bring the milk to the point where it’s just about to boil. You’ll see bubbles forming at the edge, but don’t let it reach a full rolling boil all over. Stir occasionally with a flat spatula so nothing sticks. Once it hits that stage, turn off the heat. Slowly add your acid. Lemon juice and white vinegar are the classics, but a mix of the two works wonders too. Some folks swear by curdled yogurt for a subtler taste. Add a tablespoon at a time, and with each addition, stir gently—not vigorously! You want soft curds to form and begin separating from pale greenish-whey. When you see this, stop adding acid. Let the mixture rest one or two minutes so the curds fully collect.
Line a colander with a double layer of cheesecloth, and place it over a bowl to catch the whey (which, by the way, is great in dough recipes or soups). Gently pour in your curds. Rinse under cool water for 10-20 seconds; this stops the cooking process and removes that acidic tang. Gather the cheesecloth edges, twist gently, and let it drain naturally while you tidy up the kitchen or check TikTok. Once most of the whey has drained (about 4-6 minutes), flatten the bundle into a disc. Place it on a plate, then set another flat plate on top. Place your saucepan or a couple of cans as the weight—remember, not too heavy. Let it press for 30-40 minutes. Too little time, and your paneer won’t hold its shape. Too much, and… well, hello, crumbly block.
To slice cleanly, refrigerate your paneer for at least an hour after pressing. Bonus: chilled paneer is less likely to break apart in hot dishes. If, like me, you try to use it when it’s still warm, the odds of crumbling go way up. One sneaky trick for foolproof texture is adding a spoonful of fresh cream while you stir the curds in the whey, right after curdling—this boosts richness without messing with the chemistry. My daughter Larissa can taste the difference.
If you’ve ever wondered about salt, the answer is yes—you can add it at the time of curdling or after pressing, but I find it easier to season the milk once it’s come to a simmer. Just a pinch; too much draws moisture out and actually promotes crumbling.
Worried about how long fresh paneer lasts? Store it covered in water in an airtight container. Change the water daily, and it’ll stay fresh three or four days. Want it longer? Freeze it. Thaw in the fridge, then dunk in hot water for a few seconds to restore that soft bite.
Here’s a quick checklist—keep this on your fridge door if you need a reminder:
- Always use whole, fresh milk (avoid UHT and low-fat).
- Don’t let the milk boil; turn off heat just as it rises.
- Add acid gradually; use lemon juice for flavor, vinegar for firmness.
- Once curds form, avoid stirring too much; gentle is best.
- Drain, rinse, and press gently—never with excessive weight or for too long.
- Chill before slicing or adding to hot dishes.
If you’re in a hurry, remember that shortcuts cost texture. Paneer’s magic is in the patience and attention. The reward? Paneer that’s soft, creamy, and doesn’t fall apart at the first sign of a curry spoon.

Common Questions and Kitchen Fixes
Sometimes, no matter what you do, disaster strikes—unexpected crumbliness, rubbery texture, or flavor that’s just not right. What now? If your paneer has already gone crumbly, you can still use it. Crumbled paneer makes an excellent filling for parathas, a topping for salads, or the star of bhurji (Indian-style scrambled eggs, minus the eggs). To fix paneer that’s too dry mid-recipe, soften it by dunking the cubes briefly in hot water before adding to curries—this helps bring a little moisture back, though it won’t fully repair over-crumbling.
The kind of acid you use changes both flavor and structure. Lemon juice gives a gentle, slightly tangy taste, while vinegar is neutral but makes for a firmer, slightly drier result. Some people experiment with citric acid (diluted in water) or even yogurt whey saved from previous batches. Save your leftover whey—it’s packed with nutrients (protein, calcium, vitamin B12) and can boost doughs, soups, or even your next batch of paneer for extra flavor.
For families or anyone who likes prepping ahead, try scaling up your recipe, but remember that bigger batches need extra care when separating and pressing. Spreading the curds out in a larger surface area (like a sheet pan with a mesh sieve) helps keep things even. I keep a batch of homemade paneer in the fridge, and it saves me on weeknights when Larissa suddenly asks for palak paneer or paneer tikka at 7 p.m. Making paneer a few times helps you spot the signs—curd separation, right amount of drain, perfect firmness—so practice isn’t just for show, it’s the secret to consistency.
Texture isn’t just about technique. The kind of milk—buffalo milk, which has a higher fat and protein content, produces creamier paneer than cow’s milk. In India, buffalo milk is often preferred for traditional mithai (sweets) or special recipes. Consistency, though, is harder to nail; even packaged ‘buffalo’ milk can vary depending on your supplier's cows.
If you want to get nerdy, here’s a little table with the protein and fat content differences:
| Milk Type | Average Fat % | Average Protein % |
|---|---|---|
| Cow | 3.3 | 3.2 |
| Buffalo | 6.5 | 4.5 |
With higher fat and protein, buffalo milk curds can bind together better, yielding softer paneer. If you’re stuck with cow’s milk, you can try enriching it with a splash of cream for a similar effect.
If your paneer borders on rubbery instead of crumbly, it’s usually a sign of overheating or over-pressing. Take it off the heat as soon as it splits, limit pressing to just under an hour, and always rinse briefly in cold water before pressing.
One last gem—if you need to fix crumbly texture at the last minute for guests (or picky kids like Larissa), you can mash the paneer with a little milk or cream, form small balls, and use as koftas or stuff into dosas. No one will know the original plan went sideways.
The beauty of paneer-making is that it isn’t about factory precision—it’s a daily, hands-on adventure in the kitchen. Every batch teaches you something. Don’t get discouraged by a crumbly try; next time, you’re closer to perfect. Keep playing, keep feeding your loved ones, and soon you’ll be the one giving tips—maybe your kid will start criticizing your paneer too, just like Larissa. But that’s a sign you’re doing something right.
